Select the Best Seed Varieties for Your Climate
And chose the best spot to grow them, as well as tips on planting and support. (Part Two)


This is Part Two. You might want to start with Part One if you haven’t already read it.
Part One is titled, Seed Packets? Don’t Skip the Fine Print! It covers using the information on seed packets to help choose varieties that will do well in our climates, and how to find any important information not included on the seed packet.
The following key points are the focus in Part One: 1) Type and variety of seed; 2) Frost tolerance and frost hardiness; 3) Days to harvest; 4) Germination (or sprouting) temperature range, which is sometimes implied by a date range for planting, or a statement to the effect of; ‘as soon as soil can be worked.’
Here in Part Two, helping you select appropriate varieties for your region is still front and center. However, the information covered also includes things to think about when considering where in your personal garden or yard different plants are likely to thrive, and some best practices for planting the seeds and supporting the plants when needed.
My goal with these two articles is to help you make wise choices on seed varieties that will produce well in your area and in your garden, so that your time and money isn’t wasted on seed varieties that aren’t likely to thrive where you live.

Here in Part Two, the Subjects Covered are:
Amount of sunlight / exposure required.
Support required if any
Year seed was packed for
Days to germination (or sprouting) after planting
Seed planting depth and spacing
Ideally, all of this information would be found on all seed packets; however, if any is missing you can most likely find it by searching on the Internet.
Let’s jump in and explore the nuance.
5. Amount of sunlight / exposure required
Many common veggies and some flowering plants need as much sunlight as they can get for as much of the day as possible, especially in cool or temperate climates and during the cool or cloudy parts of the year. However, there are also plants that have adapted to part or full shade, and this is why it is important to check the back of your seed packets to see what they have to say about sun exposure.
Checking out some of my seed packets, I found the following notations:
‘Min Full Sun, 8-12 hrs’ (tomato, Baker Creek Seeds)
‘Light Requirements,’ Full Sun (dwarf sugar peas, Sow Right Seeds)
‘Plant in sunny location’ (patty pan squash, Ed Hume Seeds)
‘In full sun’ (icicle radish, Ferry-Morse)
‘under full sun’, (French breakfast radish, Ferry-Morse)
‘Sow in full sun’, (green arrow peas, Ferry-Morse)
These examples are all veggies, and they all need full sun, but the companies and packets have different ways of expressing it.
One company had the information in a chart, one had visual icons that clued you in on essential information, and the others buried in in paragraphs, so you have to read the fine print.
Full sun generally means at least six hours of direct-overhead sunlight, unless otherwise stated. If the sun is very low in the sky for most of the day, that doesn’t count as overhead sunlight. If this is the case, you should wait to plant until your days get longer and the sun is higher in the sky. If you are planting your seed in a cool or cloudy time of year, six hours of sunlight may not be enough. In that case you generally want to pick a spot with the least shade and the longest exposure to sun as possible.
It’s all about how many photons from the sun can reach the leaves. Those photons fuel photosynthesis, and that’s how plants make the carbs they need to grow. Carbon dioxide and water (in the right amounts) are also necessary, but without enough light plants can’t grow.
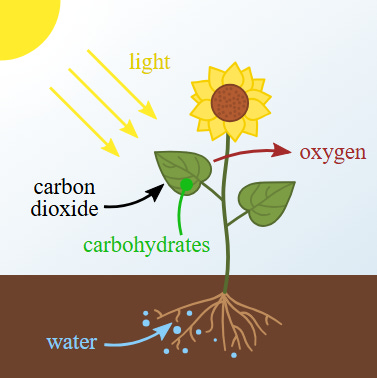
If you live in a very hot climate with summer days reaching 90f (32c) or higher, six hours of sunlight might be perfect, and you might even need to be prepared to provide your plants with some shade on the hottest parts of the hottest days. Even though I live in a mostly cool climate now, I have lived and gardened in places with very hot summers. If you find your garden is struggling with heat, please feel free to comment on any of my posts, notes, or you can start a thread in the subscriber chat with your issues or questions. I’ll be glad to help. I just don’t have room in this article.
If you plan on starting seeds inside, you will want to read: Understanding light and how to raise healthy seeds inside by Mark Ridsdill Smith. He’s the best! Most of the articles I have seen here on Substack—on starting seed inside—feature photos of leggy seedlings that aren’t getting as much light as they would really like. Mark has the best advice, he is very experienced, and he’s the expert as far as I am concerned.
I’ve also done a lot of inside seed starting. I am totally willing to try to help answer any questions you may have, but starting seeds inside isn’t currently part of my practice, and it hasn’t been for over a decade. I am not up on any of the new lighting technology that’s available now. But Mark is, and his article is great. :)
6. Support required if any
There are a number of crops that benefit from supports. The back of your seed packets may indicate if support is needed. If not, you can search on the type and variety of seed to learn more. Example: Lemon cucumber / Support.
I have a small batch of seed packets handy, which I checked. The peas all mention support, the tomato doesn’t. The other packets include three different kinds of radishes (because radishes rock) and one packet of mixed bush scallop summer squash. The radishes and squash packets don’t mention support, but none is needed.
When it comes to support, in some cases, it is the nature of the plant to climb. This includes many varieties of peas, and pole, runner, and half runner beans. These plants do better with support, and it is easier to pick their pods if they have poles or a trellis to cling to.
In other cases, providing plants with support keeps the garden neater, reduces tripping hazards, allows for better use of space, and makes harvesting easier. It also reduces the impact of plant diseases and pest damage that can spread through the soil.
Tomatoes. vining or running cucumbers, and small fruited melons and squash also benefit from support. While all of these plants can produce well without support, they may do better for you if you can give them something to climb.
The other time you might need some support for your plants, is if they get knocked over by the wind. If that happens you might want to take a tip from Strategy in the Garden, and use whatever you have on hand to stake them up. Check out their post on the subject, here.
While many garden centers and garden departments have a large selection of plant support posts, netting, and trellises ready for purchase to support your plants, you can likely find interesting and useful things in your community, for low cost or even completely free.
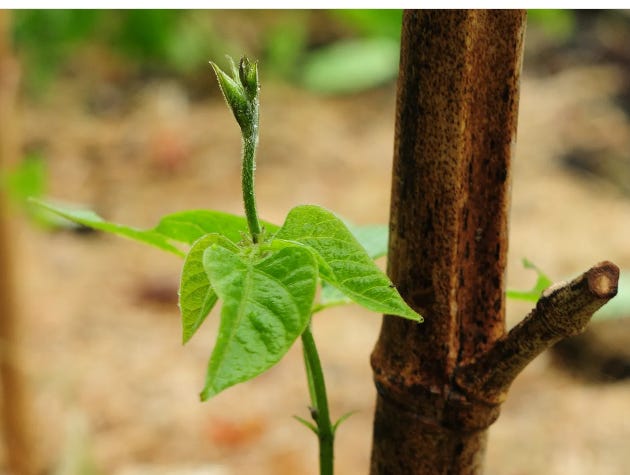
For example, in the bean and pole picture above, one of Cat’s neighbors grows bamboo, so she was able to source her poles for climbing beans from her own neighborhood. Perhaps there is a patch of bamboo or giant reed growing somewhere near you.
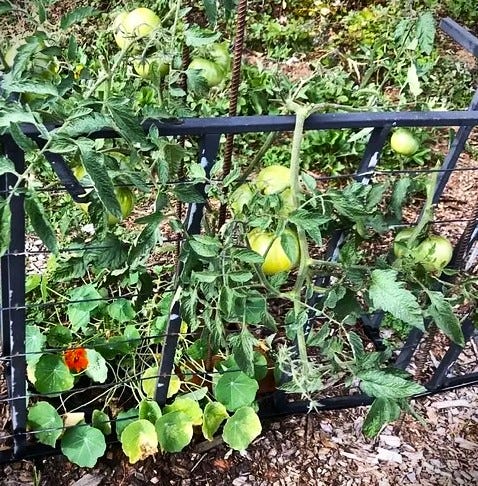
Another example is the cot-frame (pictured above) that was found by the side of the road. There are all kinds of things that people discard, which can be used in the garden to provide plant support. Oven and refrigerator shelves are very handy. Wire fencing, cages, de-triggered traps, and crates can also be used, possibly as they are or when taken apart and reconfigured.
Excess woody growth can also be put to good use. If you or someone you know needs to cut back some brush or do some pruning, you might be able to create some really attractive and unique supports for your plants. Check out this note from Ozark Freedom Garden for inspiration. You might want to click through to read the whole note and scroll through all the photos. You’ll find some really creative ideas. :)

If you would like to share your plant support or vertical gardening strategies, please feel free to add a comment. Your also welcome to drop a link to your related note or article. I may be able to feature you Substack in a future newsletter focused on plant supports. :)
7. Year seed was packed for
The short story: always check the ‘year packed for date’ and don’t pay full price for old seeds. Germination rates can fall every year past the ‘year packed for date’. It is good to understand that the seeds packed for this year, weren’t necessarily grown last year. They just had to pass the minimum germination rate test. They can already be quite old even if they were packed to sell this year.
The long story: By law, the US Department of Agriculture sets minimum germination rates for each type of seed. Seed companies are required to test the germination rate of all the types of seed they offer, if those seeds will across state lines. The testing must be done no more than five months prior to the beginning of the year the seeds will be offered for sale. Only those batches of seed that meet the minimum requirements for germination may be offered to the public for sale. And each seed packet must be marked with the year the seed was packed for. You shouldn’t find seeds being offered for sale at retail outlets that are packed for a previous year. However, some seed companies do offer steep discounts for seeds near or just past the ‘packed for’ date.
Businesses that sell seeds often donate any unsold seed packets dated for the previous year—to food banks, community gardens, nonprofits, and to libraries that host seed exchanges. These seeds are generally offered for free, and while their germination rates may be low, and they will get even lower as the seeds age, you will often get at least a little germination. If you don’t have a budget for purchasing seed, they are worth trying.
Meanwhile, the ‘packed for’ date will be printed somewhere on the back of the envelope. Here’s a photo I cropped of the back of a packet of radish seed that I recently picked up from my local library’s seed exchange.

As the seeds are at least 10 years old, I am not really expecting any germination. I was just using them as a bird attractant to see if my efforts to keep the birds out of one of our garden beds was effective. They were eating every single seed and seedling. Now the birds are staying out of that bed!
I hope to bring you information on protecting seedlings in the future. And if you have notes, articles, or photos on how you protect your seedlings, you can participate if you want. If you're interested, leave a comment. I might be a little slow to respond, because I am getting ready to move.
Here’s a bit of the US law related to the ‘packed for’ date:
§1593. Standards, tests, tolerances, from: 7 USC Ch. 37: SEEDS
(a) The samplings, analyses, tests, or examinations of seeds made in connection with the administration of this chapter shall be made by methods set forth by rules and regulations prescribed under section 1592 of this title.
(b) The Secretary of Agriculture is authorized and directed to make and promulgate by rules and regulations, reasonable tolerances as to the percentages and rates of occurrence required to be stated or required by this chapter.
(c) For the purpose of section 1571(b) of this title, the Secretary of Agriculture is authorized and directed to investigate, determine, establish, and promulgate from time to time such reasonable standards of germination for each kind of vegetable seed as will in his judgment best protect crop production.
8. Days to germination (or sprouting) after planting
Most seed packets list the days to germination on the back of the packet. It is usually expressed as a range of days. The first packet I checked out was, Baker Creek’s Napa Chardonnay Blush Tomato, it says: “Sprouts in 7-14 days.”
Ferry Morris has a chart with the heading, ‘Care & Maintenance.’ On my packet of organic Icicle Short-Top Radishes, it notes: “Days to Germ 4 - 7.”
Lilly Miller has a prominent chart, with a section called ‘Days to Germination.’ For their Champion Radish, it indicates it will take 10 - 14 days.
Knowing how many days your seed takes to germinate, lets you know when to start looking for seedlings. What they don’t tell you, but is also helpful to know, is what the seedlings look like. If you search on the type and variety, and the word seedling, you should be able to find photos. I got the best results with a search structured like this: ‘Banana squash / seedling photos’.
Meanwhile, the actual days to germination can vary by soil temp (covered in part one), planting depth (covered below), light exposure (covered above), and soil moisture (if you are starting seeds indoors or in containers, that’s covered here, and if your direct seeding in the garden, you’ll find more info here).
If you don’t keep all of these things dialed in, you might not get any germination at all.
Yes, it’s complicated. That’s why I recommend that beginners let radishes be their teachers. Radishes are the best teachers any novice gardener can hope for.
No paywalls for now. All the articles linked above will have the paywalls turned off through 3-27-24.
9. Planting depth and spacing
The seed packets I have been keeping near to hand as I write, all have the planting depth and the suggested seed spacing clearly stated. Most of them share this information on charts. One of them has the info in a short paragraph on ‘Sowing.’ If you happen to find a packet with this information missing, I am sure you can find it by searching.
Seed depth is probably the most important part of this information. Seed depth is related to ‘5’ above on light. Many seeds measure light and dark, and they won’t germinate unless the right amount of light reaches the seed. If you plant them too shallow and they are getting too much light, they may think it is too late in the season to grow, and they may wait until the next year to germinate. On the other hand, if you plant them too deeply, they may think it is too early in the season, and they may not ever sprout, unless they find themselves closer to the surface of the soil. There can be a lot of nuance here, which you will learn with experience. But if you are starting with seeds from commercial packets, which generally come from plants that have had standardized care, it is best to follow the instructions on seed depth, because that’s what they are most likely adapted to.
On the other hand, on the issue of spacing, I find the instructions are useful to read, but I don’t always follow them. First of all, I don’t worry too much about how close or far apart the seeds get planted. If you have earthworms and beneficial insects living in your soil, they may more the seeds around. And if you need to water, even if you do so super gently, that can move the seeds around.
When I find I with soil showing, I tuck in a few more seeds. If the plants are getting too crowded, I pull some to eat or to use in the compost or mulch. (Not all veggies have edible leaves, if the plant isn’t usually grown for its leaves, do a search to make sure they are edible before giving them the taste test.)
Meanwhile, when the spacing instructions say things like, ‘ …sow 2 seeds per inch in row … then when plants have 3 or 4 leaves, thin to one inch apart.’ I either sow the seeds (more or less) one inch apart, or I wait longer to thin. My philosophy here, is why spend money on seed if you are going to pull the plants up before they produce? I think that advice benefits the seed industry more than it benefits you.
If instead of greens and roots, we are talking about seeds that can grow up to be big sprawling plants, (like tomatoes, squash, and melons, for instance) and if we are talking about a variety that you have never grown before, paying a little closer attention to seed spacing recommendations on the packet is a good idea.
If the spacing instructions seem a little mysterious, a few searches might help clarify. I experimented searching on tiger melons and got the best results using, ‘Tiger melon vines / size’. This worked for tomatoes and squash varieties as well. For peppers and eggplants, which can get big, but usually don’t sprawl, I switched the word ‘vines’ for ‘plants’ and got good results. Just be sure to include the exact variety name in your search, and include any special designations such as ‘giant,’ ‘bush,’ or ‘dwarf.’
Hey, that’s all for now. I’ve run out of room, and I think you’re ready to go!
However, learning new terminology and new skills can take a little time. If you have any questions, please feel free to ask in comments, or in our subscriber chat. If I am slow to answer, please be patient with me, I might be in the middle of moving! In the meantime, if someone asks a question that you know the answer to, please feel free to jump in and help. :)
~ ~ ~
Thanks for reading, I appreciate all of you! I not only appreciate you, I am totally amazed with how many of you there are. :)
I should be back next Sunday with an article featuring Substack ‘Soil Conversations’ and controversies, plus some (maybe a lot) of commentary from me. However, I may be in the middle of moving, so the timing might be a little off, and the commentary might be a little under nourished. Please be patient with me. Moving won’t take forever. :)
~ ~ ~
Please feel free to forward, share, restack, excerpt, or quote this or any of my articles or notes, as long as your post automatically includes (or you add) a link back to the original note or article. If you just want to use my sources without any of my writing, neither links nor permission is required. Do contact me about any other ways you might want to use my writing, as all other rights are currently reserved.
Text Copyright Harvest McCampbell, 2026.
Image credits are found under the photos, in their respective captions. (Thanks to everyone who shared photos! And an extra big thank you to Ozark Freedom Garden for not only sharing photos, but for writing commentary on those photos. And to Strategy in the Garden who prepared a post so it could be shared with all of you.) ;)
See you next week.
 | A guest post by
|
We always hear how to adapt plants for cool climates. In Central Texas, if you put a plant in full sun because the label says to do so, unless it’s a Texas native, it will die immediately. Summer temperatures here are usually 98° to 105°. It’s brutal on plants.
Thank you for this helpful information.