Rain Barrels for Beginners
This is part three of Gardening in Hot Summer Climates, but it is useful information for anyone with rationed or expensive water.


Here’s everything you need to know to set up your first rain barrel, whether you want to buy a readymade system or put one together yourself with a repurposed food safe barrel and easy to find hardware.
Rain barrels—and the skills to use them—are useful on large and small properties, in arid areas and in areas with high but seasonal rainfall, and in urban and other areas where water is expensive or rationed.
Rain barrels don’t just capture rain. They can also capture dew, melting frost, and other condensation. Any form of moisture that accumulates on your collection surface (which is generally a roof), at any time of day or in any season can trickle down into your water storage system. This can be a boon in very dry areas.
Rain barrels can also a be a fun and useful addition in your landscape, incorporated into science fair projects, or a first step in the learning curve—before you super-size and start catching and storing more significant amounts of water.
Even one small rain barrel can be valuable, as a convenient place to fill a watering can when you don’t want to drag out a hose. They can also make an interesting conversation piece or a water feature complete with fish. (The link goes to a cool Facebook post, but it doesn’t cover everything you need to know.)
Starting small is a good way to get a feel for rainwater harvesting, even if ultimately you want to store far more water than will fit in a barrel. Working with a rain barrel (or two or three) will help you build your intuition about the dynamics of rainwater collection in your area, rainwater storage possibilities, and the use of the stored water.
My eldest uncle was passionate about collecting rainwater. He was an engineer, and he designed and built elegant rainwater catchment systems. Personally, he utilized several 1,500-gallon cisterns and was able to supply most of the water for his medium sized ranch.
How did he do that? Let’s do some back of the envelope math. One inch of rain per square foot of collecting surface = about .6 US gallons of water (rounded down). If your collecting surface is a 1,600 square foot roof, an inch of rain can net you 960 gallons. If you receive an average of 35 inches of rain a year, that’s 33,600 gallons. It definitely won’t fit in a rain barrel. But starting with a rain barrel can teach you a lot.
My uncle also designed water catchment systems for large landscapes, hilltop homes, gardens, and for bonsai production. He included rain gardens and other rainwater infiltration systems to refresh small aquifers. This can help keep wells productive. He also incorporated rain barrels where one might need a ready nearby supply of water; for instance, near greenhouses and potting sheds.
I won’t be tackling all of those rainwater catchment strategies, but I do want you to be aware of the possibilities. What will be covered in this article, are all the basics that you need to know if you want to 1) purchase a ready to use system; 2) use a repurposed food grade barrel to put together your first rain water collection & storage system; and 3) ask intelligent questions of folks in your area that already use rain barrels. (Talking to local folks who are doing what you want to do, is always a good idea. And that is the last topic at the very end of this article.)
Let’s get started!
Is It Legal?
The first thing you may want to learn is, is it legal? If you suffer from water shortages or expensive metered water, it may make sense to catch as much of the water that falls on your roof and other structures as you can. However, some local governments do not agree. While water catchment systems are legal and encouraged in most of the cities and counties here in Washington State (US), that is not always the case. In the weird way that US water rights work, the rainwater that falls on your roof and your property can ‘legally’ belong to someone downstream that holds ‘senior water rights.’
While I don’t think it is very likely that anyone would sue you over a rain barrel, one never knows. You might want to ask your local permit office a few questions before you get started. It might be good to know what is allowed and restricted in your area, and whether or not permits are required, and if there are any standards your system must meet.
When you decide you are ready to go ahead, the first thing you need to think about is your rainwater collection surface.
The Rainwater Collection Surface
Generally, folks use the roof of a house, shed, barn, greenhouse, or other building. I’ve also seen mobile demonstration setups with upside down umbrellas and repurposed satellite dishes used as rainwater collection surfaces. Tarps can also be arranged to collect and direct rainwater into barrels. This practice is fairly common in scientific field research and at archeology study sites in remote areas.
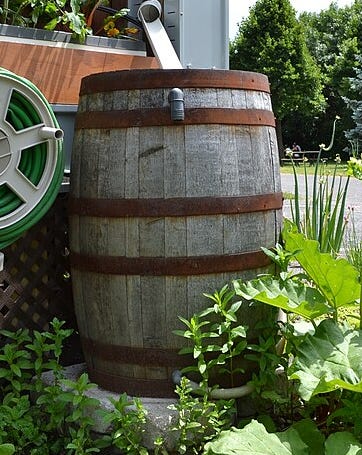
The rain barrel in the photo below is missing some key features you will want, and if you check out the link in the photo caption (after you read this article) you will be able to recognize some additional mistakes they seem to have made. But it does show a roof being used as a rainwater collection surface, and it serves as an illustration for some other points made below.

The easiest way to use a roof to collect rainwater, is to utilize an existing rain gutter system, However, I have also seen simple systems where barrels were set up along a roof drip line, to catch the water flowing directly off the roof.
Many rainwater systems are not completely closed as the one above seems to be. Screens to catch debris and to block mosquitoes are useful for systems that are open to the air. And ultimately, you may want your system to be at least a little open to the air.
Screens can be Essential
Fine mesh screened lids and water inlets of various designs allow water to enter barrels and tanks while excluding most of the debris the water may be carrying. A fine mesh that will exclude mosquitoes is ideal, and you might want to add a layer of sturdier screen to maintain the strength and stability of the fine mesh, and to extend its useful life. In addition, sturdy screens will help ensure that small animals won’t falling into your barrel.
If your system is fed by a covered gutter system and is closed to debris, as the one in the photo above appears, screens may not be needed. However, a system that can breathe a bit and easily adjust to pressure and temperature changes, and is also easy to clean has some benefits. You’ll find more info on closed systems vs systems that can breathe in the next section on ‘Lids or Not’.
Meanwhile, screens need to be checked regularly so a build-up of debris doesn’t block your barrel’s inlet. Readymade rain barrel screens are available to fit many sized barrels and inlet openings. Once you have settled on a specific barrel, (whether repurposed or readymade) and you know the demission’s of the lid or the inlet opening, it’s time to shop for screens, unless your chosen barrel comes with one that will work for you. (You’ll find lots of choices for screens at your local hardware store or favorite online outlet.)
If you will be using a roof gutter to direct water to your rain barrel, you may want to consider attaching a screen to the wall right under the eaves, and well above the point the water enters your barrel. These screens will be harder to reach to clean, but in some cases, they may be the best strategy. The book, ‘Rainwater Harvesting for Drylands and Beyond, Volume 1,’ (pages 71 & 72) has ideas for screens attached to the wall of buildings. (I have an older edition, page numbers may vary a bit in newer editions.) You can probably check this book out from your local library, or find it used through your favorite bookseller if you're on a budget. If you ever want to go bigger than a rain barrel, or want to use the water for more than just irrigating your garden, you may want to own this book.
Lids or Not?
In the first photo above, the entire top of the rain barrel is covered. This has benefits and drawbacks. It will keep dust and debris out of the barrel, and reduce or eliminate the possibility of algae growth. However, you don’t necessarily need or even want a totally air-tight lid for best results. It’s a good thing if the lid can breathe a little, for several reasons.
First of all, water averages a bit over 8.3 pounds per gallon (nearly 4 kilograms). If you have a 30- gallon rain barrel, that’s 249 pounds of water (when full) + the weight of the barrel and any attached hardware. If there is, say, an earthquake, or if, say, the soil under the barrel isn’t as stable as you might think, and the barrel sinks more on one side than the other—and it tips the barrel over—you really do not want a full barrel rolling towards a child or even through your garden or landscape. If the lid can fall off easily the barrel will lose weight quickly. However, you will still need to make sure small kids can’t crawl inside. I don’t mean to be a Debbie downer, but the sort of lid or screen you decide to use, and how you will prevent children from climbing inside the barrel are big decisions.
A barrel with a secure top or lid that a child can’t crawl into, but that also has a fairly good sized well screened opening might be ideal. You can browse ‘Rain Barrel Lids’ on your favorite garden, hardware, or general online shopping page to get some ideas of the types of lids available. Once you have chosen a barrel, you can modify any lid it came with, or design or purchase a lid that will work for you. But don’t get a head of yourself here. There is a lot of ground to cover before you start shopping for a barrel and a lid.
Meanwhile, barrels with secure airtight lids may need to be vented in order to fill and drain properly. As air pressure and temperatures fluctuate, they can alter the pressures inside the barrel. If you have a closed system and an airtight lid, and water is spilling out of the roof gutter, or if it won’t run through your outlet hose, chances are you need to install a vent.
However, if too much debris has accumulated in the bottom of your barrel, it can slow or stop the flow as well. And if you have an airtight system, and don’t have an overflow outlet (as pictured on the barrel below) or if the one you have can’t handle the amount of overflow the rain is producing, that can cause water to spill out of your roof gutter as well.
For more info on vents, see pages 71 & 72 of ‘Rainwater Harvesting for Drylands and Beyond, Volume 1’. On page 72 you will also find an idea for securing the lid, which just involves screws. If you are learning towards a breathable system, add some washers, and the same technique would probably work for screens as well, especially if you use a fine mesh screen with 1/4” or 1/8” hardware cloth.
The Need to Clean
Another consideration for both screens and lids, is that they do need to be removed periodically, so you can inspect and clean the inside of the barrel. No matter how hard you try to exclude dust and debris, some is going to get inside. You want to be able to look in there and decide when it needs to be cleaned. The best time to do that, is when the barrel is almost empty. But you can also syphon the water out into another container if it needs done when there is still a significant amount of water. You will want to use a gentle non-toxic soap and a soft brush or rag, so you don’t damage your barrel or poison your garden.
Next will talk about the overflow and outlet.
Overflow and Outlet
First the overflow. You will need an overflow outlet attached to a pipe or a hose in nearly every rain barrel, cistern, or water tank installation. In the photo above, you see the first part of an overflow system near the top of the rain barrel. Depending on where you want to direct the overflow water, either a hose or a pipe would be attached to the overflow outlet. If you are in a high rainfall area, or even in an area that can receive large downpours on an occasional basis, your overflow outlet may need to be larger (maybe much larger) than the one shown above.
Having a well-designed and thought-out overflow system prevents the overflow water from spilling out onto the barrel and soaking into the ground beneath the barrel. There are two reasons this is important. One, if the area is wet, it makes it harder to detect leaks, which will need to be fixed. And two, if the ground is frequently wetter than it needs to be, even intermittently, it can reduce the load bearing capacity of the soil, which might lead to a rain barrel toppling over. Leaking and possibly unstable rain barrels can be a big issue on or near slopes, which you can learn more about here. But stability should be thought through in every case. And if you are depending on the water in the rain barrel, you definitely want to be able to spot leaks right away.
As you think through your overall overflow system, you will want to decide how and where to direct any excess water that won’t fit in your barrel. You can design your system to transport and disperse overflow water directly to your landscaping, garden, or to a rain garden, or you can send the overflow to another barrel, cistern, or tank.
If you want to send the overflow water out into your yard or garden, the simplest thing to do, is to install overflow hardware that a hose can be attached to. Then you can move that hose around so that no one spot will have to absorb all the overflow water. If decide you want a more permanent arrangement for your overflow, you will find some idea on pages 71 & 72 of ‘Rainwater Harvesting for Drylands and Beyond, Volume 1’, and on page 79 of the ‘Water-Smart Garden’, by Noelle Johnson. (I searched and searched but couldn’t find any clear photos or videos to illustrate some options, but the ‘Rainwater Harvesting’ book is awesome and I highly recommend it. The ‘Water-Smart Garden’ book is beautiful and full of interesting ideas, some of which you may be able to use. You can probably check both books out from the library.)
On the other hand, if you want to connect your overflow to another rain barrel, I found a great website with clear instructions, a clear graphic, and an awesome photo: Linking Multiple Rain Barrels for Maximum Water Storage. They also have links to quite a few relevant articles, and they sell a number of products and supplies for do-it-yourselfers and for those who just want to purchase a complete system. However, some of their prices seem a little steep (well, actually, some seem very steep), so shopping around is a good idea.
Now for the water outlet. By this we mean the outlet through which you are going to utilize the stored water. The water outlet is near the bottom of the barrel, and it is often designed to accommodate a standard outdoor faucet and garden hose, as seen below.
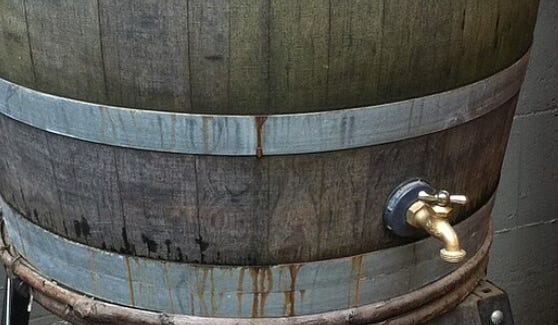
.jpg)
You may want a second outlet, a foot or so higher than the main outlet, if your area is subject to a lot of windblown dust or pollen, or if you are using uncovered roof gutters to collect rainwater. If it’s impossible to avoid dust, pollen, and other debris entering your barrel, that higher outlet will allow you to draw out cleaner water, when you really need it.* Just remember that rain entering the barrel will likely stir up any settled sediment up, and it may take a few days for it to settle back down.
*About that cleaner water. It will not be clean enough to drink. But it may be better for topping off a fishpond or a fish tank, for instance, than water that is full of sediment.
If you want water that is clean enough to drink, see page 76 of ‘Rainwater Harvesting for Drylands and Beyond, Volume 1’. In the case study mentioned, the folks involved use a drip irrigation ‘Y-filter screen’ between their water tank and their indoor faucet. However, there are many other details in their system that allow them to trust their water quality. My Uncle’s systems, when they included drinking water, had small under the sink water purifying appliances. These appliances had really good filters and added a little chlorine to the water as well. More recently, one of my cousins had a similar filtering system for her drinking water, but instead of adding chlorine, it treated the water with ultraviolet light. You may want to consult your local codes for any regulations related to filtering well or stored water, and contact local folks in the know, before purchasing a filtering system (should you want one).
DIY - Repurpose a used ‘food safe’ barrel to catch the rain:
You will find links to a couple of videos below to help you get started. But first I want to make a general point about rain barrel stands.
I don’t recommend placing a rain barrel on a stand of any kind. Many sites do recommend it, because it increases water pressure. And both of the videos I am sharing below also recommend it. But if you are just going to use the water to irrigate your garden, low water pressure is best. Soil does a better job absorbing a gentle trickle than it does a quick flow. And there is always some danger that your stand will fail or that there will be some kind of a natural disaster that could rock the barrel over, which could cause damage or injury.
The first video below has super simple instructions for connecting your barrel to your rain gutter downspout. This will likely work with either a purchased rain barrel or with a repurposed barrel that you have added overflow and outlet hardware to. (The outflow from the rain gutter extender will need to match up with the inflow opening of your rain barrel. That will make sense after you watch the video.)
The second video gives very clear instructions on installing the overflow and outlet hardware on repurposed plastic barrels, and (complicated) instructions for connecting your barrel to your rain gutter. As a bonus, it also gives tips on finding and choosing a barrel. If those tips don’t work for you, I include a link (below) to an article that will give you a few more ideas.
Connecting your rain barrel to your rain gutter downspout, the easy way: The video at the following link shows how to make a very simple connection between your downspout and your rain barrel, which is why I am including it. They simply cut the downspout, install a flexible down spout extender, and place the bottom end of the extender over an opening in the top of the barrel, which already had a screen installed. Another advantage of this strategy, besides being simple, is that if the rain barrel tips over it won’t pull your roof gutter down with it. (In other strategies, when the barrel lid is securely attached to the barrel, and the plumbing connecting the downspout is securely attached to the lid, and the barrel tips over, something is going to tear or break, and it might be your rain gutter.)
Meanwhile, the specific rain barrel they are installing in this video, may not be widely available. But if you shop around you should find lots of different options, if you want to purchase a ready to use system. Here’s the link: Installing A Rain Barrel - YouTube
Adding overflow and outlet plumbing to a repurposed barrel: The video at the main link below clearly describes and shows the tools and supplies used to create your overflow and outlet. (I looked at a lot of videos, and this one is the best.) However, if you are going to be using more than one barrel, you probably don’t want to connect them at the bottom, as shown in the video, for reasons that are discussed here. He also discusses sourcing recycled food grade barrels to use as rain barrels, and describes the type of plastic barrel that will work the best. (If you can’t find the type of barrel he is describing, I have a possible work around for you, below.) Meanwhile, he also uses a very complicated system to filter rainwater from the roof gutter and deliver it to the rain barrel. Learn how to add your overflow and outlet plumbing here: Rain Barrel System DIY
Finding and repurposing a barrel: If the tips in the video directly above don’t help you find an appropriate barrel, see the section on sourcing larger containers in my article on ‘The Repurposed Container Garden’. (The paywall on this article is temporarily turned off.)
If available barrels are too thin to ‘tap’: (If you're not sure what I mean by ‘tap’’ watch the Rain Barrel System DIY video.) Once you get an idea of what sort of plastic barrels, tubs, and tanks are available in your community, and how thick the material they are made out of is, if they are too thin to ‘tap’, visit your local hardware store or your favorite handyman and ask about alternative ways you can install overflow and outflow hardware. If they don’t have ideas, there may be locals who collect rainwater that can give you some advice. Tips on finding local advice is found in the very last section below.
Considerations for rain barrel placement
Depending on your geography and the layout of your lot or property, you may not be able to follow all of these suggestions. But that’s OK. They are just suggestions.
First and foremost, your rain barrel needs a stable level footing. A six-inch thick concrete pad that is at least 2” larger on each side than the bottom of the barrel should be considered. For best results check your city or county planning department’s web page for the codes for water heaters, rain barrels, and water tanks. I know you won’t be using your rain barrel for a water heater, but the same or similar strategies for keeping water heaters stable will likely work for your rain barrel as well. Your local codes will likely take into account the most frequent natural disasters that can affect your area. If the codes aren’t online, you can call or stop by and ask for a copy.
If your barrel will be on or near a slope, please see my article, Be Careful When Gardening on Slopes. (No paywall until 5-23-26. after that you can subscribe for $5 a month or contact me on Substack chat and ask for a free pass.)
The closer your barrel is to your rain gutter’s downspout, the less hardware you will need, and the easier your installation is likely to be. This isn’t always doable, but it will be less expensive if it can work for you.
You will need to check your rain barrel for leaks on a regular basis, make sure you have a clear line of sight for all sides of your rain barrel.
Place your rain barrel, on solid stable ground, a little higher or at the same elevation as your garden if possible. If this isn’t possible, you may need to add a stand or a pump* to your system. I am generally not in favor of stands, but in some situations they may be necessary. If that’s the case, make sure the stand is very secure and that the barrel or barrels are also secure. *(My Uncle incorporated small pumps into some of the systems he designed. I don’t know how to do it, but I know it is possible.)
Placing your rain barrel in the shade will prolong its life, help keep the water cool, and—if you are using a plastic barrel—it will reduce the amount of microplastics that dissolve in the water. If you don’t have a shady spot, you may be able to build a shade structure to protect your barrel, or you can build a simple trellis and plant vines to provide shade. If you need some ideas for creating a do-it-yourself shade structure along with a couple of ideas for vining veggies see section 3 of my article Gardening Tips: Hot Summer Climates, Part 1, the focus is on providing shade for plants, but the tips will work for rain barrels, cisterns, and water tanks as well. (The article is behind a $5 paywall. If you need a free pass, send me a message request through Substack Chat.)
Climate and Temperature Considerations
On hot days and in hot dry climates, evaporation can take a toll on your stored water. A loose lid or other covering can reduce evaporation. Shade or insulation of some type may be essential (see number 6 in the section above). Heat also causes water to expand. You might want to check your system on hot days, and let a little water out to take the pressure off of any segments that may be airtight, including water that may be trapped in hoses or pipes.
Water doesn’t just expand when it gets hot, it also expands when it turns to ice. When you are expecting freezing weather, you may also need to release some of your stored water to avoid damaging your water storage infrastructure. The book, ‘The Water-Smart Garden’, recommends completely draining rain barrels before freezing weather. ‘Rainwater Harvesting for Drylands and Beyond, Volume 1’, on the other hand, starts out recommending keeping water storage infrastructure no more than 80% full if freezing weather is expected. But then it goes on to say that it would be best to contact someone who stores rainwater in your area, and I concur with that recommendation.
Finding Locals Who Collect Rainwater
Facebook is the best online platform for connecting with local folks on garden related topics. Search Facebook Groups on the name of your town, county, or country plus topics like: rain barrels, permaculture, homesteading, and gardening. (You will be prompted to set up an account if you don’t have one already.) You can then introduce yourself and ask if anyone in your area has a water barrel, and let them know what your questions are.
Your local Cooperative Agriculture Extension is a great place to ask questions related to water wise gardening and water catchments systems. Outside the US, there are probably similar agencies. I found my local Cooperative Agriculture Extension in my phone book under the County listings, and they were listed as WSU Extension, (WSU stands for Washington State University.) I also found them on the web by searching on the words ‘Cooperative Extension.’ On the website, I clicked the link for the local county, and that gave their phone number, which was also available in the phone book. Give your local Cooperative Extension a call and let them know what your questions are.
In the US, every region has a Conservation District office. They can answer questions, and they sometimes can send someone out to do a site visit at little or no charge, and they may have classes or workshops available, and they sometimes have small grant programs as well. You should find them under your county listings in the phone book or by searching on the name of your county and ‘conservation district.'
Your local Public Works Department may have knowledgeable people on staff who can answer questions or even do a site visit. If they don’t know the answer to your questions, they may have good resources to find the answer. You can find them by searching on the name of your city or county, in the phone book or online. Contacting public works could possibly trigger a code enforcement officer to visit your property. If that wouldn’t be welcome on your part, one of the other options might be the better choice.
~ ~ ~
It’s your turn! If you have or if you install a rain barrel or water catchment system (large or small) please take photos to inspire others. If you have or make a Substack note or article on the topic, please feel free to drop a link into comments—with a little (or long) introduction. I might restack or include your comment in a future article. The more helpful information we can circulate the better!
~ ~ ~
Thanks for Reading! That’s all for now, but I’ll be back soon with more tips you can use. :)
For next week I have two possibilities, the first is ‘Organic Pest Control Basics',’ it’s built on Substack notes, but it needs a lot of restructuring and editing, so we shall see. The other possibility is an article on my little Strawbale Garden experiment, using no artificial fertilizer. It also needs a little work, but not as much as the pest control one.
In the meantime, I will also be working on a full-length article on gray water, with a focus on a low-tech, low-cost gray water system, that you won’t need a permit (or very much money) to put into place. That may take a few weeks to get dialed in. In the meantime, you can check out my Substack notes for occasional peeks into what I am working on in the garden and whatever else crosses my mind in the whole realm of food, gardening, and agriculture. :)
~ ~ ~
Please feel free to forward, share, restack, excerpt, or quote this or any of my articles or notes, as long as your post automatically includes (or you add) a link back to the original here on Substack. If you just want to use my sources without any of my writing, neither links nor permission is required. Contact me about any other ways you might want to use my writing, as all other rights are currently reserved.
Text copyright Harvest McCampbell, 2026. Links to photo credits are found in the captions.
~ ~ ~
 | A guest post by
|